Make Your Own Spanish Guitar - online book
Complete plans & Instruction on how make your own Spanish Guitar.
| Share page | Visit Us On FB |
|
28 |
|||
|
|
|||
|
the marked twelfth fret comes exactly where the neck joins the body of the guitar), hold it in position with several G cramps throughout its length. By using a piece of leather or wood, the same width as the fingerboard, over its entire length, cramp marks will be avoided.
Inside the guitar, under the overlapping part of the fingerboard, use another piece of wood to enable another G cramp to be used to hold this part of the fingerboard in position whilst the glue is setting.
When the glue is set the shape of the neck can be finished off with rasp and glass paper. Details are given in Fig. 30.
CUTTING THE FRET SLOTS
Now we come to the actual cutting of the slots to take the fretwire.
These slots must be at right angles to the centre line of the fingerboard.
Making sure you are cutting at right angles to the centre line, cut the slots on the previously marked positions, using a small fine-toothed ** Gents " saw and cutting about 1/16" deep.
Fretwire is supplied in " T " section and, if you have a choice, choose nickel-silver wire rather than brass. Before attempting to fit the fretwire it will be necessary to ser�rate the upright of the " T." This can be done by gently tapping it, with the edge of an old file or the chisel-end of a small ham�mer, with the wire held against some hard surface�an old-fashioned flat iron with its handle gripped in a vice will be found to be ideal. Care should be taken with this operation�just enough pressure being given to the blows to burr the edge of the upright of the wire. If the fretwire is hit too hard the "playing surface" will lose its even contour.
Most luthiers run a little thin glue or painter's knotting along the upright of the wire before inserting it into the fret slot. This does not, in any way, make the wire "hold" better but it can prevent any pos�sible vibration of the fret when the instru�ment comes to be played.
It might be found easier to cut the fret-wire into the required lengths before inser�ting it in the slots. If you proceed in this manner, cut the lengths of wire a fraction of an inch longer than needed and lay the |
lengths out in order on a piece of wood placed on the bench beside you as you pre�pare them. The luthier uses a long length of wire, and after tapping one fret in posi�tion, files it off at the required length.
FITTING THE FRETS
When fitting the fretwire, first run the glue or knotting along the upright and then tap it home with a small hammer; taking great care to see that the blows are evenly distributed along the entire length of the wire. If you err in this respect you will find the wire will have a tendency to buckle at the ends.
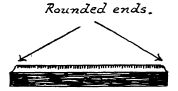
When all the frets have been successfully fitted, the ends are first filed flush with the fingerboard (taking care not to take off wood from the sides of the fingerboard) and then carefully rounded off with a small flat file, held in a lengthwise direction, so that each fret end is finished off at the same angle. (See Fig. 31.) |
||
 |
|||
|
Fig. 31.�After all the frets have been fitted the ends of each fret are rounded off.
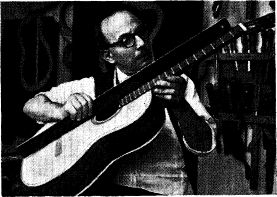
Now check the fretting by placing a steel straightedge along the fingerboard. If any one fret is higher than its immediate neigh�bour it should be bedded down by gently tapping it with the hammer. If any faults in fretting cannot be corrected in this way, |
|||
 |
|||
|
Checking the fretting. |
|||
|
|
|||